The BEST Dutch Oven Bread
This post may contain affiliate links.
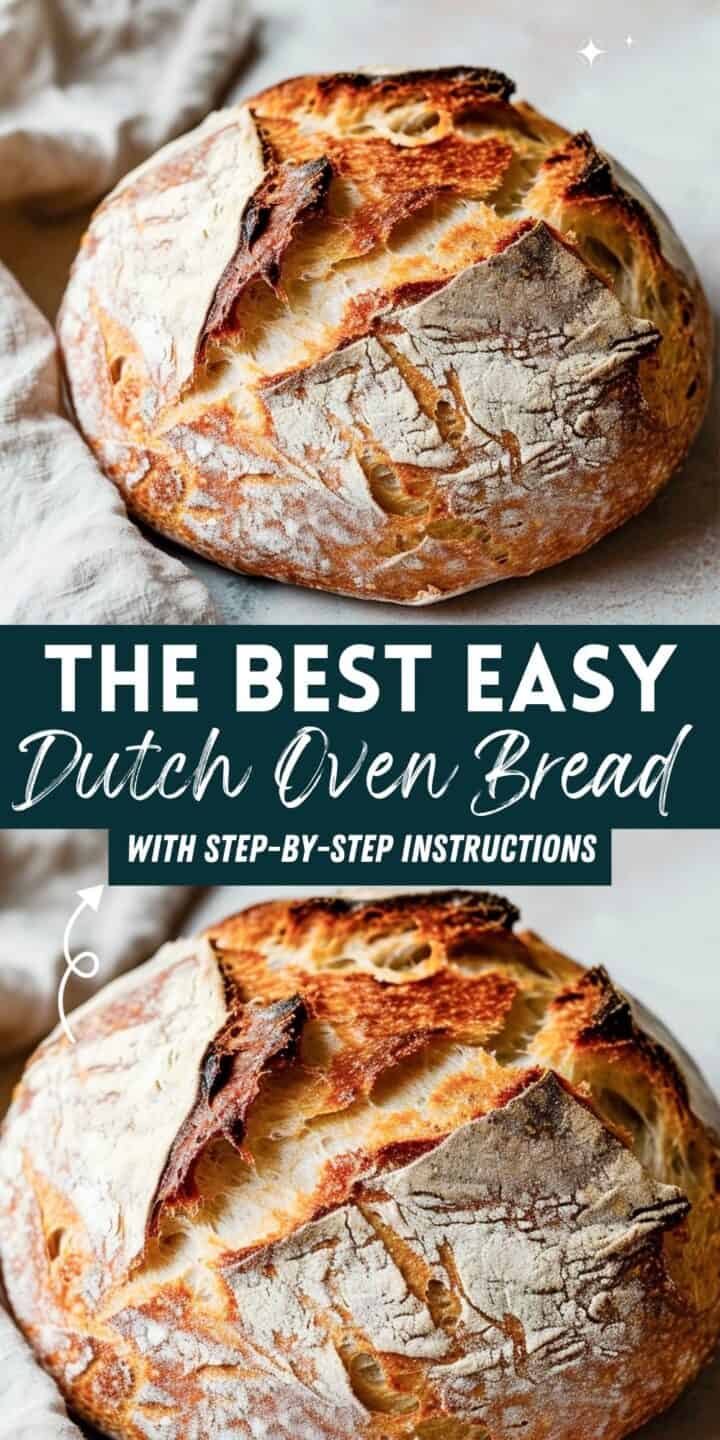
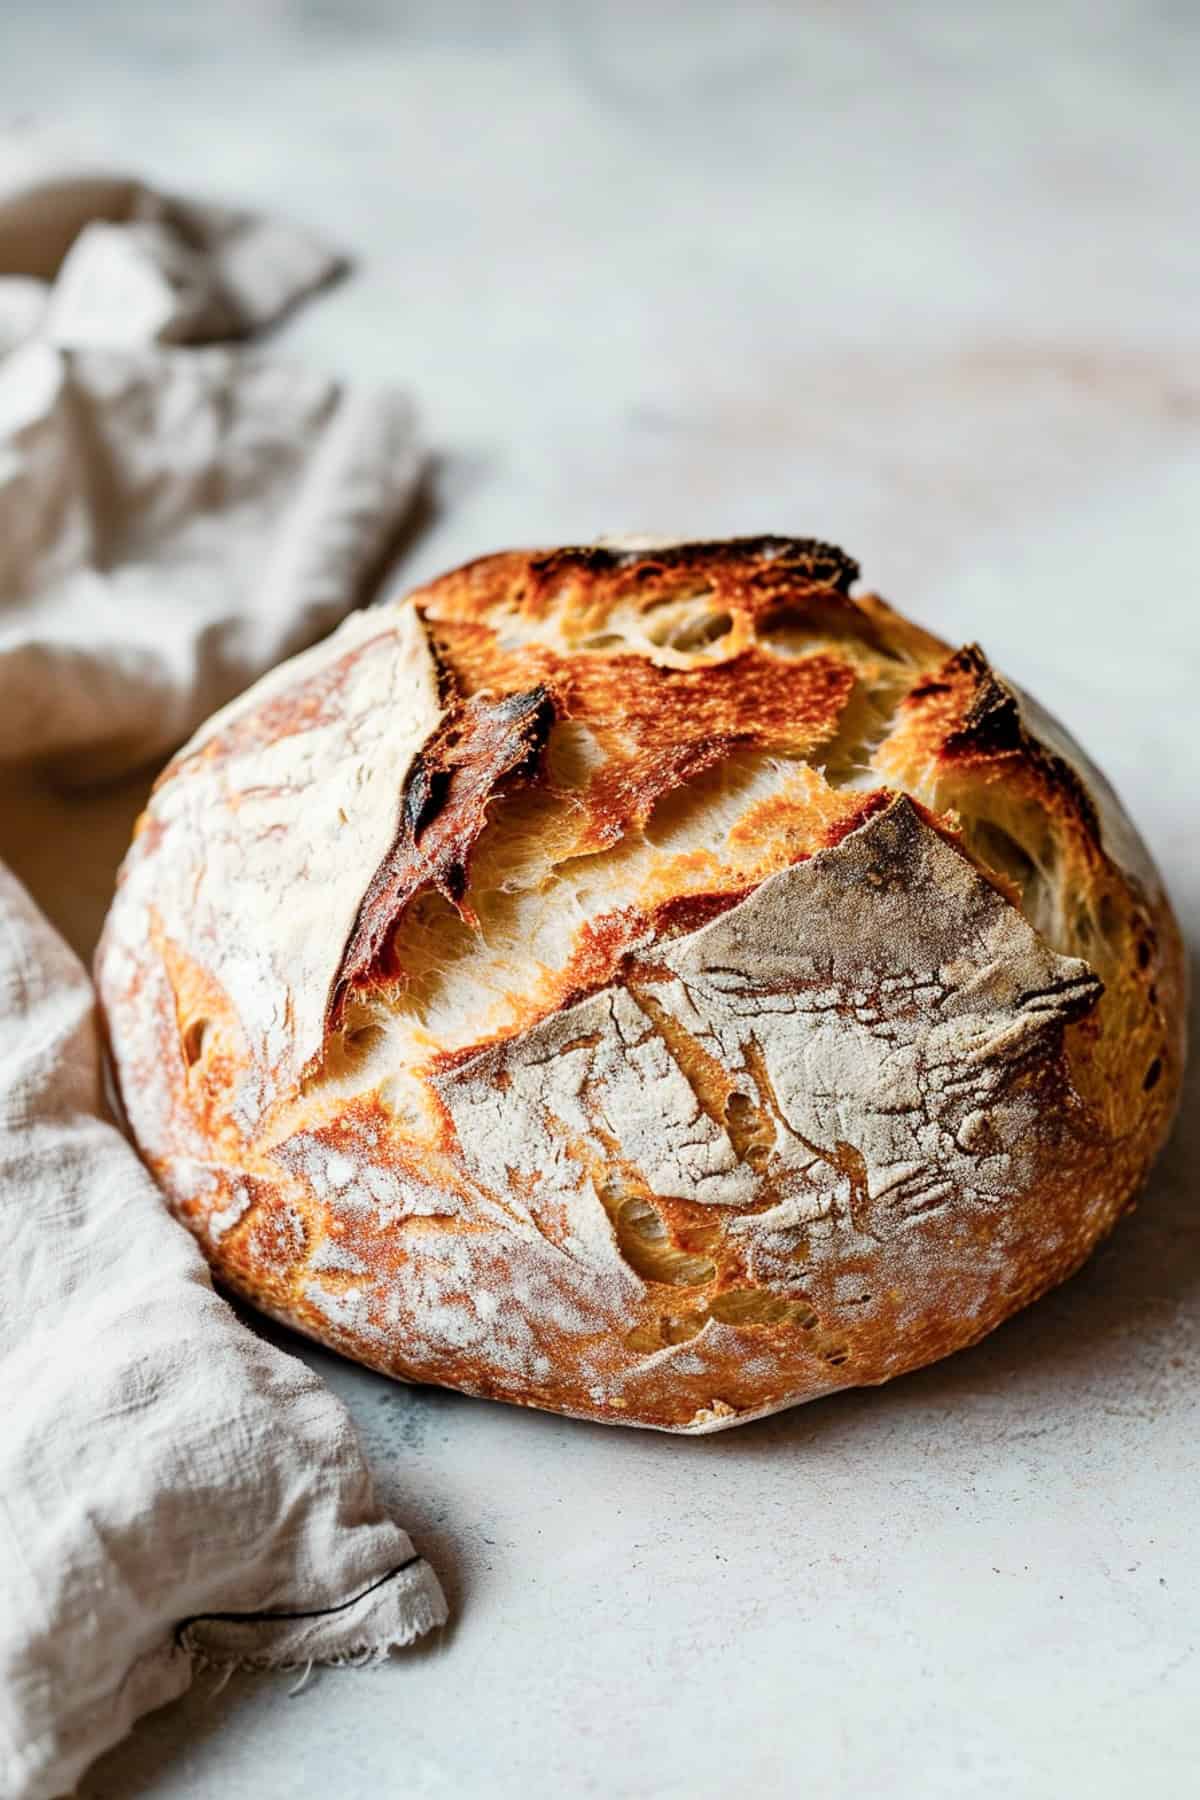
Make fresh homemade bread easily with this Dutch oven bread recipe. With simple steps and minimal ingredients, you can bake a crusty loaf with a soft interior, perfect for any level of baker.
This bread is perfect for dipping in soups or stews like this beef and ale stew, this lentil and bacon soup, or this broccoli and stilton soup. You can also try my 2-ingredient naan.
⭐️ Why this recipe works
- Simple Ingredients: Uses basic pantry staples like flour, salt, and yeast.
- Perfect Crust: Dutch oven traps steam for a crispy, golden crust.
- Flexible Proofing: Can adjust rising time based on your schedule.
- Beginner-Friendly: Easy-to-follow steps suitable for novice bake
- Cost-Effective: Homemade bread at a fraction of the shop price.
🧾 Ingredients overview
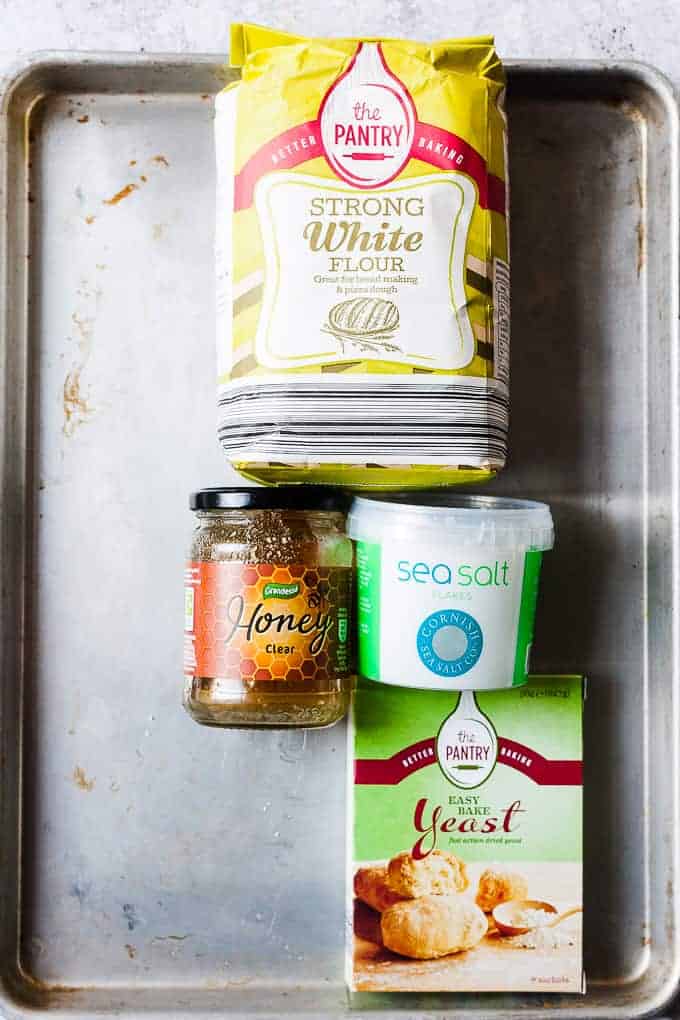
- Strong Bread Flour: Provides structure and chewiness.
- Salt: Enhances flavor and controls yeast fermentation.
- Active Dried Yeast: Leavens the bread, creating air pockets.
- Warm Water: Activates the yeast and hydrates the dough.
- Honey: Feeds the yeast and adds a hint of sweetness.
- Extra Flour: Used for dusting and preventing sticking during kneading.
For precise measurements and additional ingredients, refer to the recipe card at the bottom of the page.
👩🏻🍳 Here’s how to make it
Dutch Oven Bread recipe step-by-step
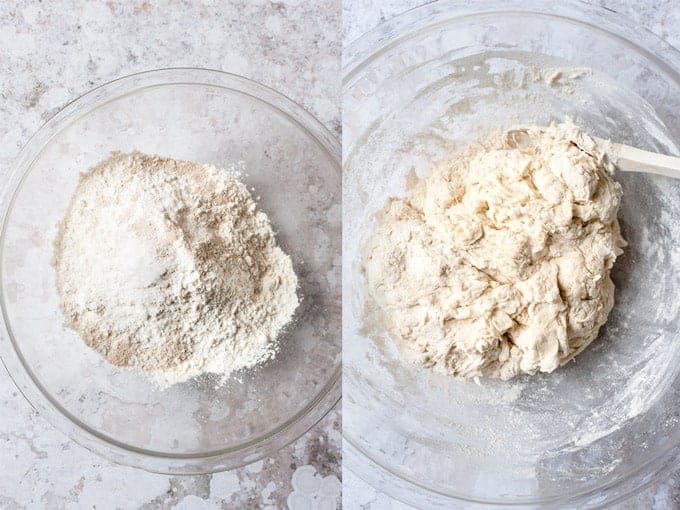
- Combine Dry Ingredients: In a large bowl, whisk together the bread flour, salt, and yeast until well combined.
- Prepare Wet Ingredients: In a measuring jug, mix the warm water and honey until the honey is completely dissolved.
- Mix Dough: Create a well in the center of the dry ingredients and pour in the water-honey mixture. Using a wooden spoon or your hands, mix until a shaggy dough forms.
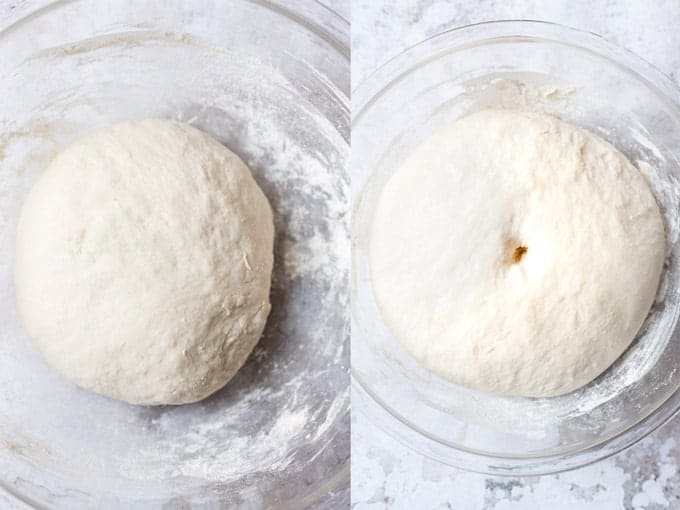
- Knead the Dough: Flour your work surface generously. Transfer the dough to the floured surface and knead for about 10 minutes, until the dough is smooth, elastic, and springs back when pressed.
- First Rise: Place the dough in a clean bowl, cover with a tea towel, and let rise in a warm place for 1 hour, or until doubled in size.
- Preheat Oven: Preheat your oven to 200ºC. Place an empty cast iron Dutch oven (with its lid) into the oven to preheat as well.
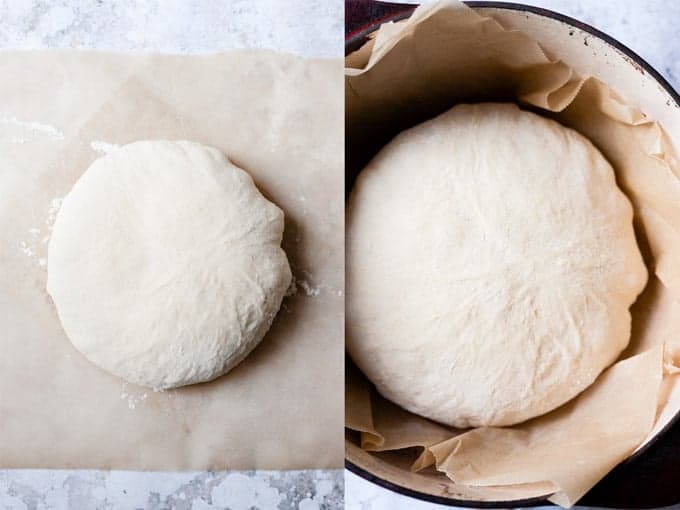
- Shape the Dough: Once the dough has risen, punch it down gently to release the air. Shape it into a round ball with the seam side down.
- Prepare for Baking: Place the dough onto a large piece of baking paper. Carefully lift the paper and transfer the dough into the preheated Dutch oven. Cover with the lid.
- Bake Covered: Bake for 25 minutes with the lid on, allowing the steam to create a perfect crust.
- Finish Baking: After 25 minutes, remove the lid and bake for an additional 15 minutes, or until the bread is golden brown and the crust is crisp.
- Cool the Bread: Carefully lift the bread out of the Dutch oven using the edges of the baking paper. Transfer the bread to a cooling rack. The bottom of the bread should sound hollow when tapped.
📖 Variations
- Flour: Substitute up to half of the strong bread flour with strong whole wheat flour for a nuttier flavour.
- Sweetener: Replace honey with maple syrup or agave nectar for different flavor notes.
- Add-Ins: Mix in herbs, garlic, cheese, or seeds during the initial mixing for added flavor.
💡 Chef’s Guide: Expert Tips
Drawing on a decade of experience in Michelin-starred kitchens and Cordon Bleu training, I have compiled my top tips for recipe success.
- Steam Creation: For an extra crispy crust, spritz the dough with water before baking.
- Scoring: Slash the top of the dough before baking to control expansion and create an artisan look.
🍯 Storing and reheating leftovers
- Fridge: Store the cooled bread in an airtight container in the fridge for up to 1 week.
- Freezer: For longer storage, wrap the bread tightly in plastic wrap and foil, then freeze for up to 3 months.
- Reheat: To refresh the bread, warm it in a 175ºC oven for 5-10 minutes, until the bread is soft and the crust is crispy.
❓Recipe FAQ’s
The bread should be golden brown, and the bottom should sound hollow when tapped. An internal temperature of 90°C also indicates doneness.
Dense bread can result from under-kneading, insufficient rising time, or using too much flour.
Yes, you can use a heavy oven-safe pot with a lid or a baking stone with a metal bowl inverted over the bread to trap steam.
The dough should double in size. You can also perform the “poke test”: gently poke the dough with your finger; if the indentation remains, it’s ready.
Ensure your yeast is fresh and active, the dough is kept in a warm environment, and the dough has enough time to rise.
Looking for more easy bread recipes like this? Try these:
If you tried this Dutch Oven Bread please let me know in the comments below, and please leave a star rating while you’re there!
For more recipe ideas, follow us on Pinterest, Facebook, and Instagram, and join our exclusive Facebook group.
For meal planning assistance, check out our weekly Aldi-only meal plans, free for subscribers.
Craving more comfort food? Visit our sister site, Salted Mint, for easy, delicious recipes with everyday ingredients.

The BEST Dutch Oven Bread
Ingredients
- 500 g strong white bread flour
- 1½ teaspoons salt
- 7 g 1 packet active dried yeast
- 350 ml warm water, around 40°C / 104°F
- 1 tablespoon honey
- Extra flour, for dusting
Instructions
Mix the Dough
- In a large mixing bowl, combine the flour, salt, and yeast. In a jug, mix the warm water with the honey until dissolved. Pour the liquid into the dry ingredients and mix with a wooden spoon or your hands until a rough, shaggy dough forms.
Knead the Dough
- Turn the dough out onto a lightly floured surface and knead for 10 minutes until smooth and elastic. The dough should spring back slightly when pressed.
First Rise (Bulk Fermentation)
- Place the dough in a clean, lightly oiled bowl. Cover with a damp tea towel or plastic wrap and let it rise in a warm place for 1 to 1½ hours, or until doubled in size.
Shape the Dough
- Once risen, punch down the dough to release air. Turn it onto a floured surface and shape it into a tight round ball by folding the edges into the center. Place it seam-side down on a piece of baking parchment.
Second Rise (Proofing)
- Loosely cover the dough with a tea towel and let it rise again for 30–45 minutes, or until puffy and slightly risen. Meanwhile, preheat your oven to 220°C (200°C fan) / 425°F and place your Dutch oven with the lid on inside to heat up.
Bake
- Once the dough has risen, carefully remove the Dutch oven from the oven. Lift the dough using the parchment paper and place it inside the pot. Cover with the lid and bake for 25 minutes, then remove the lid and bake for another 15–20 minutes, or until the crust is deep golden brown and the loaf sounds hollow when tapped.
Cool
- Remove the bread from the Dutch oven and place it on a wire rack. Let it cool for at least 30 minutes before slicing.
Notes
- Temperature of Water: Ensure the water is warm (around 38-43ºC) to activate the yeast properly.
- Kneading: Proper kneading develops the gluten, which is crucial for the bread’s texture.
- Rising Environment: A warm, draft-free area is ideal for the dough to rise.
- Handling Dough: When transferring the dough to the Dutch oven, be cautious as the pot will be extremely hot.
- Checking Doneness: If you’re unsure whether the bread is done, use a thermometer. The internal temperature should be around 90-93ºC.
- Don’t skip the second rise — this is crucial for getting an airy crumb and proper structure.
- If your dough feels too sticky to knead, add flour 1 tablespoon at a time — but avoid adding too much.
- You can slash the top of the dough right before baking to help it expand and look rustic.
Nutrition

Meet the Chef!
Hi, I’m Debs, a Cordon Bleu-trained chef dedicated to helping you create unforgettable meals on a budget. Discover more about my journey and dive into a world of foolproof recipes designed for those who love to eat well without overspending.


Can I use this same recipe to make hamburger buns?
Hi Angela. I think this dough may be a little bit on the wet side for burger buns. You’d noramally want a recipe with a lower hydration. I’ll work on something this month!
Such a great easy bread recipe. Love this one!
A super simple recipe. Loved this one!
Brilliant straight forward bread recipe. I never jumped on the sourdough train and just wanted something that was easy. This is definitely a keeper!
So easy. I’m new to bread making and this recipe is perfect for me! Really nice and easy with a great result.
I’ve tried making dough using many different recipes. No matter what, my dough doesn’t come together and looks more like a brain (if I could attach a picture I would). I followed this recipe and no matter how long I knead it never got smooth. What am I doing wrong?
Thanks!
It sounds like maybe there isn’t enough water in your dough. Once you have a dough with enough moisture, you’ll find it much easier to knead and get a smooth finish. Let me know how it goes.
My family and i LOVE this recipe!!
So happy to hear this! And thank you so much for taking the time to leave a comment. It’s so appreciated. 🙂
Is this a 5 quart Dutch oven?
Yep. It sure is. I’ll update the recipe to reflect that. 🙂
Mine didn’t get much color, do you know why this could be?
Potentially the Dutch oven wasn’t hot enough. You can always turn the heat up for the last 10 minutes so the bread gets some extra color.
Lovely easy bread recipe. Thank you.
What temperature do I bake at after the Dutch oven is warmed? I tried this twice and after exact following, the dough is still white and doughy. Only thing I can imagine is oven needs to be hotter or cook much, much longer. 200’ ain’t getting it done hahaha
Hi Lisa, It’s 200ºC so that is 400ºF. I’ve updated the recipe now with both temperatures. That will result in you having a gorgeous crust loaf of homemade bread! 🙂
This is the best bread recipe I’ve ever made! The first time I made it I didn’t read the instructions properly and heated my oven to 200ºF. Of course that was far too low. How ridiculous to think it would bake at that temperature! But when I did the conversion and realised that 200ºC is actually 400ºF that made more sense. I think Americans always assume that everything is made for us and don’t even think that we may need to convert temperatures or measurements. Anyway, this loaf turned out absolutely fantastic! Thanks for a great recipe!
Hi Andrea! Thanks so much for taking the time to leave a comment. It’s so appreciated. I try and be as inclusive as I can when writing recipes and try to include both measurements and temperatures in metric and imperial, but of course there will be times where I miss something. But thanks so much for being understanding about it. 😉
I’ve tried this recipe twice and my bread is really dense. I’m sure it’s me but what could be causing this?
Dense bread can be caused by a couple of issues. 1. Not kneading the dough for long enough. It really needs to develop the gluten. 2. Not enough water in the dough. You don’t want the dough to feel “wet” but we really want a well hydrated dough to start out with. 3. Potentially adding too much flour during the kneading process. Hope that helps. Let me know if you try this recipe again and how it goes. 🙂
Great recipe! Worked out really well. Loved it! 🙂
The best bread recipe.
Made this bread with the correct oven temps and can say it’s perfect! Very happy with this recipe. Thanks
First time making bread, this was easy and delicious!!
So happy you found this recipe easy as a first time bread baker! Thank you so much for taking the time to leave a comment! 🙂
Hi could this be made into cheese & onion bread?
If so recommended quanties please
Thank you
Hi Caroline. Absolutely, You can make this into cheese and onion bread. You can pan-fry some diced onions until they’re golden and tender. Drain them off on some kitchen towel and then add them into the flour along with the cheddar. I’d use about 25-30g of onion and about 75g-125g grated mature cheddar. You can adjust the quantities by about 10-15g less or more to suite you taste. Let me know how it turns out! 🙂
This recipe is so quick and easy. Thank you so much for sharing it.
WHAT SIZE POT DID YOU USE TO BAKE THE BREAD IN PLEASE
A casserole pan with a base of at least 23cm. You can use a cast iron pan or a stainless steel one. Cast iron would be a little bit better because it holds more heat, but they both work really well. 🙂
Thank you.
Just checked mine and it is 21 cm 😒
Do you think you could add cheese and sundried tomatoes. If so what amounts do you think would be suitable.
I want to get into bread baking
It’s close enough; that size should be fine. You just don’t want something tiny. You can definitely add sundried tomatoes and cheese. I’d start with about 50g of chopped sundried tomatoes and about 75g of shredded cheddar. Add both into the flour before adding any liquid and carry on with the recipe following the remaining instructions. This is a great base recipe and would also make lovely raisin cinnamon bread. About 100g of raisins and 1 tablespoon of cinnamon would be great! Happy baking! 🙂
Excellent. Thank you for your helping.
I going to make your seafood chowder and do this bread to go with it
❤️😍💕
Amazing! Let me know how it goes! And if you have any questions just let know and I’ll get right back to you! 🙂
Can I use regular all purpose flour for this? Also, can this be made in a 7.5qt enameled cast iron Dutch oven?
Absolutely you can! If you’re in the US or Canada you can use AP flour. In Europe our plain flour doesn’t have enough protein to build the gluten required to give rise to bread. But in North America, all-purpose flour does contain enough protein to build the correct amount of gluten. Happy baking! 🙂
I made this bread and I was really pleased with the results!! Just had some with a bowl of soup. Do you think it would work if I added olives?
Absolutely. Olives would be lovely in this recipe.
Great basic bread recipe used brown flour and made into rolls and worked well.
Bread rolls went superb with some home made veg soup!
Will definitely use again, and so much better than shop bought.
I’m so happy you like the recipe. It’s such a great basic recipe for turning into all kinds of rolls and loaves!
When are you meant to add the salt? The pic shows salt but I can’t see quantity. I just realised now I have made it without salt 🙁
Absolutely brilliant everyone loved the bread I was so proud
That’s amazing Suzie!!! Thanks so much for leaving a comment and a rating. I love that you used the word proud!!!! That’s exactly what I want for people. To be proud to feed their families amazing food and to be proud of themselves for making something amazing!!! 🙂
I loved this recipe and I wondered if I could add olives or turn it into a fruit loaf? Any suggestions for quantities of ingredients? Thanks
Hi Sue! Absolutely. Olives (black or green) and dried fruit would both be great additions to this bread recipe. To add olives make sure they are well drained of oil first and chop them. There isn’t anything you would need to do for adding dried fruit. Add either one (fruit or olives) into the flour before adding any other ingredients and proceed with the recipe as usual. They loaves may need an extra 5 minutes or so of baking time (maybe) just to be sure that the inside crumb of the bread is dry and not still dough-y. Keep me posted on how it goes! 🙂
This is a really great recipe. I’ve made no knead breads and they’re good, but I always find the bread has a bit more “life” to it once I’ve kneaded it.
So happy you love this recipe. Thank you for taking the time to leave a comment. It’s very appreciated.